
Last tutorial we looked at setting up our GameRepository interface so that we could run queries against our database by using the @Query annotation. You can import the updated source code here and continue following along if you haven’t gone through any of the previous tutorials.
This time we’re going to take a look at creating our service layer which is responsible for the business logic of our application whereas a repository is used to accomplish operations related to our database tables. For large projects, adhering to this practice allows for easier maintainability of code especially when there are changing requirements.
Setting up the Service Class
Similar to what we’ve done in the past, we’re going to create another package and name it service which will hold all of our service classes.
- Right click tutorial.springsetup
- Select New > Other and type “package” to filter
- Name this package service and hit Finish
We’re also going to create another class within this new package. I’m going to call mine GameService which will be responsible for handling anything related to our Game entity. Once you have created your service package and made a new class within this package, your project directory should look something like…

Cool, so we’ve created our first service class but before we create any methods we need to annotate this class with @Service (similar to @Entity in our Game class) which will allow for this class to be auto-detected via component scanning when we run this project (but don’t worry about this too much for now).
Remember our findGamesByTitle(String title) method we created last time inside of our GameRepository class? I want to add a little more logic to this by formatting the input title parameter before executing this method so I’m going to make a new method inside of our GameService class to do so. Here’s what my GameService class looks like now…
package tutorial.springsetup.service;
import java.util.List;
import org.springframework.beans.factory.annotation.Autowired;
import org.springframework.stereotype.Service;
import tutorial.springsetup.entity.Game;
import tutorial.springsetup.repository.GameRepository;

@Service
public class GameService {

    @Autowired
    private GameRepository gameRepo; // Autowire in our GameRepository to allow access to all public methods

    public List<Game> searchGamesByTitle(String title){
        String formattedTitle = "%" + title + "%";  // wrap '%' around the input title parameter
        List<Game> results = gameRepo.findGamesByTitle(formattedTitle); // now perform our repository query
        return results; // return results
    }
}
As you can see we’ve created a new method inside of our GameService class called searchGamesByTitle which will take the value of title within the input parameter, wrap it with ‘%’ so that our query will find results that have a game title containing the value of title, and then we can call our GameRepository method to execute findGamesByTitle using our formattedTitle value. We could add some handling for the case where title is null but for simplicity I’ll leave it as is for now.
Super, we’ve added our first service method. Now we’re going to make another which will CREATE a new Game object and INSERT it into our database. This time we will take advantage of the operations provided by JpaRepository which we had extended in our GameRepository class.
Here’s what my insert method looks like (I’ve added it just below the previous one we had created)
public Game insertGame(Game game) throws Exception {
    if(game == null){    // Check that our game is not null
        throw new Exception("Invalid input!");
    }

    Game insertedGame = gameRepo.save(game);  // Save the game into the database and store the returned value
    return insertedGame; // return the inserted game
}
The insertGame method above will take a Game object as a parameter and attempt to insert it into the database. If game is null I do not want to insert it so instead I will throw an Exception. Otherwise, gameRepo.save(game) will execute where save is a method provided by JpaRepository which will insert our new object into the database.
Testing our Service Methods
Now that we have created a couple of methods inside of our GameService class, let’s see if they are working as expected. Open up the GameServiceTests class we created in the previous tutorial and we’ll add in the following test cases…
@Autowired
private GameService gameService; // Autowire in our GameService to access public methods

@Test
public void testSearchGamesByTitle(){
    List<Game> results = gameService.searchGamesByTitle("mario");
    Assert.assertEquals(2,  results.size());
}

@Test
public void testInsertGame() throws Exception{
    // Create new game object that we want to insert.
    Game game = new Game();
    game.setTitle("The Legend of Zelda: A Link to the Past");
    game.setDescription("Action-adventure video game developed and published by Nintendo.");
    Game created = gameService.insertGame(game);
    Assert.assertNotNull(created.getId());
}
Now that we have a couple of new test cases set up…
- Right click GameServiceTests in the project directory
- Run As > JUnit Test
And if your tests pass, you should see the following

Cool! We now know that our methods are working as we expected.
And if we’re really curious, we can open up Terminal and use the MySQL command line tool to execute a quick SELECT statement to double check that our game object is being saved as we expect it to.
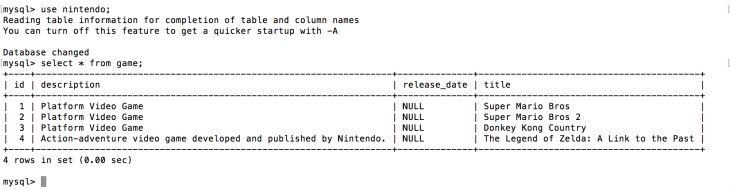
And we can see our new game that has been inserted as the last row in the table.
What we have completed so far
So far in this tutorial we have developed a basic understanding of what a service layer will contain. We’ve gone through adding a little more logic to our GameRepository method we created in the last tutorial and we’ve taken advantage of the save method extended from JpaRepository so that we can INSERT new rows into the database.
Next tutorial we’re going to be creating our GameController which will act as an additional layer to our project and we’ll go through creating our first API. This is just so exciting.
If you were having a little trouble following along or if you prefer to import the project, I’ve put the updated source code on github which can be found here.
Have any questions, comments, suggestions? Having issues getting your project to this stage? Leave a comment and I’ll be happy to get back to you.
