
Prefer to watch a video?
Otherwise keep on scrolling!
Last tutorial we managed to configure our Hibernate and database properties within our application to allow for us to create tables using Java objects annotated with @Entity and @Table. In this tutorial we will be learning how to create simple queries within our application that we can run against our database.
Setting up the Game Repository
In our last tutorial we created a table using the Game.java class. In order to run queries against our game table, we need to create a repository class. For every entity class in Java, you will need to create a repository class which will allow for you to perform simple queries.
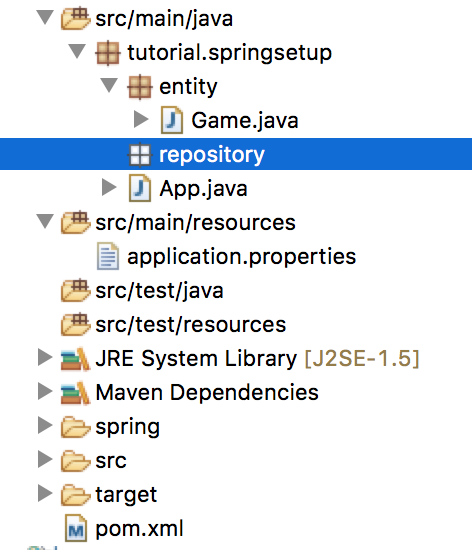
Remember in the last tutorial how we created a package and named it entity? We’re going to do something similar here, but instead we’re going to call it repository. This package will be responsible for holding all of your repository classes.
- Right click the tutorial.springsetup package
- Select New > Other and type “package” to filter
- Name your package “repository” and hit Finish
Your project directory will now look something like this…
With your new package selected, once again right click it and create a new interface called GameRepository. Once this interface has been created (and it is inside of your repository package), add in the following code…
import org.springframework.data.jpa.repository.JpaRepository;
import tutorial.springsetup.entity.Game;

public interface GameRepository extends JpaRepository<Game, Long>{

}
We’re going to extend JpaRepository so that we can make use of the generic CRUD operations that are provided through this interface. Might as well take advantage of existing operations and if you’re interested, all of them can be found here.
So we have our repository class set up, now we can start writing some queries. The first query that I want to write will perform a search for game by it’s title. To do so, I will use the following code…
@Query("SELECT g FROM Game g WHERE lower(g.title) LIKE lower(?1)")
public List<Game> findGamesByTitle(String title);
What is going on here? The first line which is annotated with @Query is responsible for the query that is going to be executed when this method is called. This might look a little different from your typical SQL as we are using our Java Game object within the statement. Basically, we are going to select every game where the lowercase title of the game is LIKE the String title parameter we are passing through in the second line of code.
I guess if we break it down we can kind of think of it like this
- findGamesByTitle(“mario”);
- @Query(“SELECT g FROM Game g WHERE lower(g.title) LIKE lower(“mario”))
- return a List of Game objects that were found when performing the query above
Testing our First Query
Awesome, so we have written our first query that will attempt to find games by their title. How do we know this is working? Let’s write a quick unit test to check that we have it set up correctly and so that you can get a better idea of how to call these methods.
- Right click on the src/test/java package
- Select New > Other and create a new class. I’ve named mine GameServiceTests
This class will be used to test all of your Game related functionality (sure it will).
Now your project directory might look as follows…
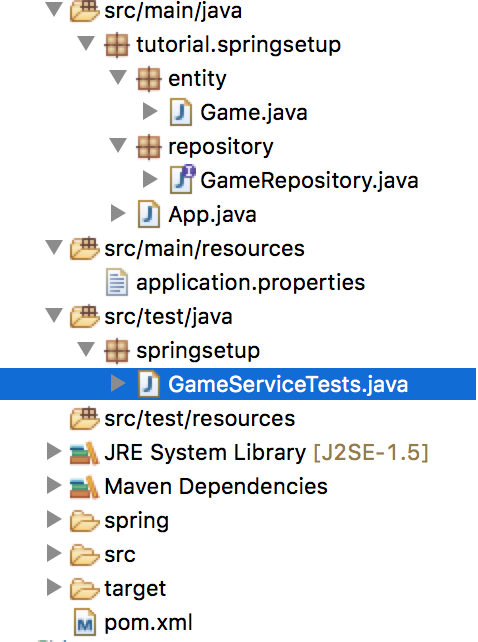
Open the GameServiceTests class you have just created and type in the following…
import org.junit.Assert;
import org.junit.Test;
import org.junit.runner.RunWith;
import org.springframework.beans.factory.annotation.Autowired;
import org.springframework.boot.test.context.SpringBootTest;
import org.springframework.test.context.junit4.SpringRunner;
import tutorial.springsetup.App;
import tutorial.springsetup.entity.Game;
import tutorial.springsetup.repository.GameRepository;

@RunWith(SpringRunner.class)
@SpringBootTest(classes = App.class) // App.class is the name of my main application class, if yours is different you might have to change this.
public class GameServiceTests {

    @Autowired
    private GameRepository gameRepo; // By autowiring in our game repository, we will have access to all of it's public methods

    @Test
    public void testFindGameByTitle(){
        List<Game> results = gameRepo.findGamesByTitle("%mario%"); // We want to find all games with a title like "mario"
        Assert.assertEquals(2, results.size());
    }
}
This is our first unit test which aims to test the query we had created in the previous step. We want to see if we can find all games with a title like “mario” and check that we are getting the expected results (in this case, we are expecting to find two games). If we run this test now, it’s going to fail because we have not yet put any data into our database. Because we have yet to create any methods that will INSERT rows into our game table, for demonstration purposes we’re going to quickly add a few rows into our table from our Terminal window.
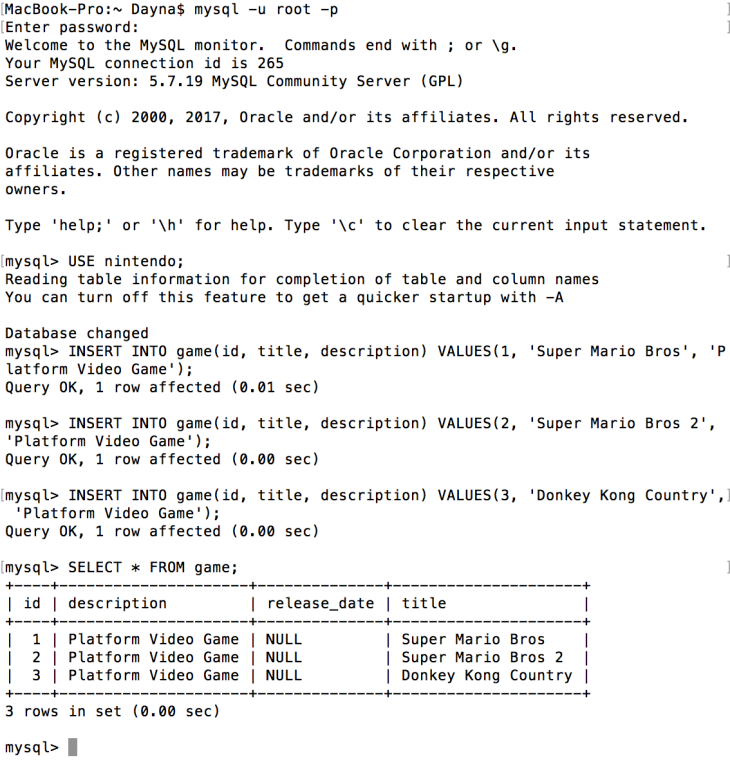
- Open up a Terminal window
- mysql -u root -p and enter your password. This should allow you to use the MySQL command line tool
- USE nintendo; so that all of our SQL statements will run against the nintendo database
Now we can start inserting a few rows for testing purposes. Copy and paste the following statements below into your terminal window so that we have some data to test with.
INSERT INTO game(id, title, description) VALUES(1, 'Super Mario Bros', 'Platform Video Game');
INSERT INTO game(id, title, description) VALUES(2, 'Super Mario Bros 2', 'Platform Video Game');
INSERT INTO game(id, title, description) VALUES(3, 'Donkey Kong Country', 'Platform Video Game');
Your window might look something like…
So now we have three rows of data in our game table, let’s run our unit test we wrote earlier to see if our query is working as expected.
- Right click on GameServiceTests.java
- Select Run As > JUnit Test
This will run your application and execute the unit test which will appear in the left panel. If it works as expected, you should see the following
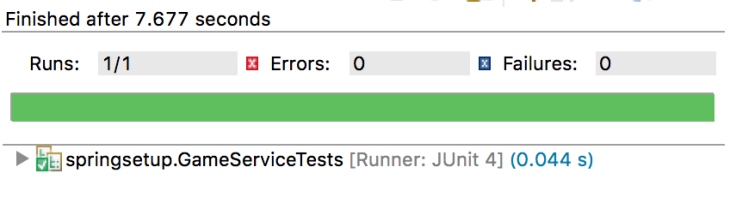
Green is good. This tell us that we have found two games in our table that have titles LIKE “mario” which is exactly the output we expect.
What we have covered so far
Cool, so if you have followed from the beginning we have managed to set up our database, create our Spring Boot and Hibernate environment, configure our project to communicate with our database, write queries within our project that will run against our database and test that they are working as expected. I hope you’ve been able to follow along without too many issues but let me know in the comments below if you’re totally lost.
In the next tutorial I will show you how to create our Service layer where we will be able to create new game entries (INSERT into) from our application as well as update/modify existing data. This is where we can take advantage of the JpaRepository we had extended in our GameRepository class.
Oh yeah, and if you’d prefer to just import the source code you can find the updated files here.
Have any questions, comments, suggestions? Having issues getting your project to this stage? Leave a comment and I’ll be happy to get back to you.
